Sunday, December 21, 2008

No Progress for TIF

It occurred to me last week that I had not posted my progress on the TIF challenges in almost three weeks.  This has been due to the fact that there has been no progress.  So, there.  Which is not to say that TIF has not been on my mind.

I looked at the December challenge and thought, "Well, I can always buy something for the 'Toys for Tots' campaign."  I could say I addressed generosity and be done with it, leaving me only the November challenge to catch up on before the end of the year.  But I jettisoned any thought of spending money on non-essentials since my husband lost his job two weeks go and probably will not find employment again until well after the presidential inauguration.

Needless to say, it's not been the happiest of holidays around here.  But I've forged ahead on some projects I dragged out of my stash.  With apologies to my Tulsa sister, I have my "hairy" sweater almost done.  My sister hates sweaters that have eyelash fibers, glitter, and other thingies hanging off of them.  I, on the other hand, love them.   So, I started the Concerto sweater I blogged about briefly on November 23, and now it's substantially done.  I just have to sew the sweater pieces together and finish the edges. (Okay, I can hear some of you laughing, given my November posts, but really, I do plan to get it sewn up by the end of next week.)

I've also been busy with other craft-related activities.  This is the time of year I always want to clean my house and change the decor around.  Starting the new year with an orderly living space has always been a sort of tradition with me, and in the last couple of days, I've been occupied with a sort out and throw away.  I actually can see my work tables, I have found some UFOs that got buried under new projects, and I have been reminded of projects not yet undertaken but for which I once held a great desire to do.  The latter was like meeting up unexpectedly with an old friend - we got reacquainted, paused for a few minutes to reminisce, and parted with promises to do it again soon.

Which led me to thinking:  When will I have time to do some of these formerly-buried projects?  How do I see 2009 shaping up for craft projects?  So, I am off to ponder my goals for next year in light of the materials I have on hand, the projects that arose from the dead, Sharon's plans for the 2009 challenge, and the time constraints I face given that I'll be working full-time for the foreseeable future. 

Saturday, November 29, 2008

SOX, not TIF

I must now officially confess to the TIF community that I have not done one thing on the November challenge project I developed, other than to plan the design and gather the materials.  Normally, I would feel very guilty about this state of affairs, particularly since I am just two months from on-time delivery of the entire challenge.  Last I heard, though, Sharon is not giving out medals, imaginary or otherwise,  for getting to the finish line, so "winning" is all about my personal victory in this, not some certificate of completion.

However, looking back over the month, I have been more productive in November than in any other during the challenge.  Having several days away from my paying job contributed mightily to this.  But if I have to blame someone for this state of affairs it's Jane.  You see, at the start of the month, Jane had this fabulous idea to draw up a monthly to-do list for projects.  It was such a good idea, I copied it and drew up my own list.  Trouble was, the TIF project never made it to the list.  Oh, all right.  It was totally my fault and not Jane's.

But don't for a minute think I didn't try to get the November challenge out of the starting blocks and down the track.  I carried that foolish quilter's hoop and the rest of the materials between my home and the capitol all month.  This alone should have kept the project on the front burner as they say, since given its size it always needed to be carried in its own bag.  I even placed the bag in my line of sight when I arrived at my destination so it was never out of sight.  I just put it completely out of my mind in favor of other projects for the last two weeks.

One of these projects was a fabric basket.  I took a class on November 16th to learn this technique.  The basket is substantially done, except for embellishments to gussy it up a bit.  I am thinking of making a few more to give as Christmas gifts.  I also made my husband some socks, also for Christmas.  So, see?  It's not like I was just sitting around eating bon-bons.  I just wasn't working on the TIF challenge.  Plus, I started a sweater using fiber I purchased eons ago in keeping with my stash-busting resolution.


So, now I am conflicted.  Do I just give up on the November challenge and start fresh with the December one?  It would sure be a help if Sharon selected a challenge like "warm feet" or "organization" or "pick one on your own" for December.  Then, I'd simply swap out one of the November projects I've already completed for December's and do the November challenge next month.  I guess I'll have to wait until tomorrow evening to see what she's got planned for us.  I can't see how I'll get two challenges done in one month, but then stranger things have happened.

Sunday, November 23, 2008

Just thoughts

All of the economic news is bad, not just for my own little corner of the world, but for most of the rest of the towns and countries across the map.  So, my thoughts naturally turned to the value of my IRA - my craft IRA that is.  I figured it was time to take stock of what I had in savings, otherwise known as stash.  I suspect that there won't be a lot of unrestricted money in the coming weeks and months to fund purchases of fabric, yarn, and notions so it would be useful to itemize the materials on hand and get down to actually using them.

It's been a useful exercise, this inventory taking.  I found a Concerto kit I purchased at Stitches East when the conventions were still being held in Atlantic City,  some hand-dyed merino I bought to make a kimono jacket, vintage Banlon I picked up at Tuckers (Allentown) to make a retro sweater or two, plus all the wool I still have left from the Harvard sheep (town, not university; enough 100% wool for at least 10 sweaters, from fingering through bulky weights - maybe I was waiting for heather shades to come back into fashion?)...  Well, you get the picture.

All of this taking stock was further spurred by my husband's birthday gift to me - all four volumes of Barbara Walker's "A Treasury of Knitting."  As I sat Friday night paging through volume 1, I realized how many beautiful stitch patterns were available to create one-of-a-kind garments if I just took some time to be creative and write my own patterns.

Now, I am terribly remiss when it comes to actually reading the craft books in my library.  They generally end up being eye candy, good for inspirational viewing.  Sometimes, they serve as a quick reference when I hit a snag on a project.  What would happen if I actually treated these volumes as textbooks?  What if I actually stopped being Plow-ahead Peggy or Little Miss Know It All?  What if I take Jane's idea of a monthly project list and make a year-long list?  A New Year's resolution to read one craft book a month and work up one item from stash related to that craft book?  Heaven knows I have craft projects I'd like to do lined up since 1975.  If not now, when?

This plan will do little to help the economy.  But it certainly makes more sense to use the fibers now  rather than have my family put $250 worth of merino hand-dyed yarn in a yard sale for $10 after I'm gone from this earth.  I can just see that yard sale table now!  The mental image alone is enough to make me seriously consider this de-stashing plan for my New Year's resolution.  And it will be a lot easier to do than giving up chocolate.

Saturday, November 15, 2008

I Am Not Cleopatra

My TIF challenge for the month remains undone and this weekend blogging exercise reminds me that I had better get going if I want to get even one letter done on the piece I designed.

What I did spend time on was the layout of the teapot squares for my lap quilt.  It turned out the concept was interesting - teapot, teacups, and dishes of petit fours all from different fabrics, but the result was less than satisfying.  Oh, all right.  The results were horrible.  Each block was just darling all by itself, but together, they fought with each other like mad.  I spent a total of ten hours over the course of a week moving the completed blocks around, trying different fabrics for the blocks still needing completion, and generally trying to get a cohesive whole using the five finished blocks.

At some point in this futile exercise, I remembered something an instructor in a knitting class once said.  The class's topic was correcting knitting mistakes.  The instructor asked us how many times we reached a point in our knitting where we looked at the evolving garment and thought it might be too big/too small/pattern off/etc.  but we keep going thinking things would work themselves out?  We all raised our hands.  Now, this is a hilarious state of affairs.  If you think something isn't working, why forge ahead?

So, since my name is not Cleopatra (Queen of Denial), I ripped out most of the work on the first five blocks and started over after accepting the problems and fixing them.  They were:
  • too many fabrics in each block and in the nine blocks together - Each block is more effective if the teacup and saucers are cut from the same fabric and the trim of every item in the block  is the same.   The blocks work together if a least one of the fabrics is repeated in either the teacup or the teapot section;
  • two palettes too many - Some rose shades were blue and others brown.  They needed to be in the same color family to tie the blocks together.  And some "pop" colors (purple, for example) were just too strong for the quilt as a whole.
  • too many embellishment types - I jettisoned the multicolored beads and funky flosses in favor of gold beads (to echo the gold in the "wallpaper") and floss and tiny ribbon rosebuds in the same color palette as the fabrics.  I have a bit of lace on hand, and will see if that can be incorporated without making the design look junky.
Here is one of the blocks waiting to be appliqued.  The only thing remaining from the original block is the petit fours.


And here is another block, with just the teapot remaining.


And finally, here are the nine blocks together.  In this photo, the corner left and top center blocks need to be cut, but I completed that step on Thursday evening before I packed up to head back to Aiken. 


I suppose I should accept the need for more do-overs in mid-project because my knitting instructor was right.  Why waste time forging ahead when you have a gut feeling that a project is not working out?  I am much happier with this layout.  The fabric content isn't quite what I wanted, but I don't have enough fabric in my stash to bring my mental vision to fruition.  This is a good compromise because I think the blocks look like they all belong in the same quilt and  the design isn't so busy that your eyes can't settle on a block without being totally annoyed by neighboring blocks.

As to the sashing fabric I purchased for this quilt?  That will be set aside in favor of a solid fabric or one with a very small print.  But I will not make any more purchases until I get all of the blocks assembled.  That will be the time to decide what will go best with the design.  I will be working on this project over the course of the coming six months.  Now that I am done with vacation days, I will have less time to devote to my fiber activities so my output will slow down considerably.  Too bad, too.  I was having so much fun!

Tuesday, November 11, 2008

Un-fiber, Un-TIF

Ah!  So many comments on recent posts that it's scary.   I am beginning to feel pressure, not only to complete my challenges but to post regularly.  So, since I am still working on that Hanne jacket and I am home for one last weekday, I will blog on another topic:  perfection.

I am waiting for my kitchen floor to dry.  While I was mopping, I got to thinking about Jane Brocket.  Ms. Brocket writes a blog called Yarnstorm.  My Tulsa sister put me onto this blog about two years ago when she said, "You've never read "Yarnstorm?" (in a tone that implies everyone involved in fiber must be reading this blog.)  So, I wrote down the address and got officially hooked.

Ms. Brocket is, I think, England's answer to Martha Stewart, only she is far more insidious.  Martha Stewart complicates every household activity beyond belief and has no shame in hiding that fact.  Ms. Brocket makes it all look easy.  And that is what is dangerous for us "normal" moms.

Whenever I want to visit a foreign land, I plonk in Yarnstorm on my keyboard.  For a few minutes, I get to envision a perfect life in a faraway land.  And not just far away in mileage.  No, far away in lifestyle.  A lifestyle that is so unlike what my son experienced, I wonder if he will sue me and his father one day for the cost of psychotherapy.  He never got homemade blueberry muffins to take to school; he got store-bought cupcakes that I rushed to the store for, cursing all the way about how I was going to be late for work.  Ms. Brocket's children get not only homemade cupcakes, but beautifully hand-decorated ones to boot.  She even takes the time to photograph them!!!!

In fairness to my own competencies as a mother, my son's childhood photos show a smiling face.  And that is why I will not allow into my house Jane Brocket's new book, "The Gentle Art of Domesticity."  Best my son not know there are functional families out there, where the mother not only has time to blog and write books, but make fabulous sweaters for her kids and take them abroad on wonderful vacations.  Better that he thinks he comes from a typical American family that is quirky but normal.  I suspect that, after four years in college, he knows this, having visited enough friends to see how they live.  But why take chances?

So, I guess what I am trying to say here is that I appreciate Yarnstorm and Jane Brockett.  I may actually purchase her beautifully written and photographed book, but I will keep it in my travel collection.  It's a nice place to visit but, all in all, I think I like where I am and where I've been and am not particularly anxious to leave just yet for a town called Perfect. 

Monday, November 10, 2008

The Filatura Sweater

I unearthed another un-pieced sweater yesterday afternoon and had a bonus moment - the shoulders were already seamed and the neck edge finished.  So it was just a matter of stitching up the side and arm seams.  Here's the finished sweater, knit in Filatura di Crosa's "Cambridge" palette #2, lot 0010.


The stitch pattern is a simple stockinette with a twist every five stitches, offset every four rows.  It was just enough of a pattern to keep things interesting but let the beauty of the fiber show through.  Here's a close-up of the fabric.  By some act of the Fates, the colors in this close-up are accurate.


Some of you may be noticing that the design of the three sweaters I've written about is the same for all.  Well, I got tired of making sweaters with commercial patterns and ending up with garments that didn't fit correctly.  So, now I don't use a pattern.  Instead, I select a sweater I like that fits me well and use the dimensions to calculate the number of stitches, bind offs, and yardage based on my selected fiber and gauge.  I make a large swatch (one ball, usually) in the stitch I plan to use for the garment.  I only manage to get ill-fitting sweaters these days when I fall in love with a pattern and slavishly follow it.

Hence, my Hanne Falkenberg disaster.   My Tulsa sister knit a fabulous "Lastrada" sweater using Hanne's kit.  Can't be too hard, I thought, since my sister was a novice knitter at that point.  It's garter stitch and the hardest part would be mitering the corners.  Well, call it the curse on someone using another person's pattern, but my sweater, made with fiber I had on hand from 25 years ago (no, there's no typo), was fit for a very womanly woman when it was finished.  I looked like a little kid wearing her mom's clothes when I tried on the finished garment.

So, I did the only thing I could under the circumstances.  I threw the sweater into hot water, spun it to damp dry, and then put it in the dryer.  Now, if this had been a sweater that fit me perfectly and that I loved beyond measure, it would have shrunk to postage stamp size and at least partially felted.  But not my Hanne disaster.  It shrunk a bit, I'll admit, so that the body wasn't too objectionable, but the sleeves were still down to mid-thigh.   Here's the sweater before alterations:


And here's the sweater after I inserted a lifeline across row 6 of the red sleeve stripes, cut the rest of the sleeve off, picked up the live stitches from the lifeline, and added a few rows to finish off the sleeve to an appropriate length for a pygmy.  


Here's the detail of the revised sleeve.


I guess this is no longer a Hanne sweater - not her fiber and not her pattern, strictly speaking.  But it's wearable now and I will use it on days when I need a lot of color in my life.  Now, I'm off to put a lifeline in the other sleeve while I still have some daylight left.  I only have one more day of vacation and I am trying to make the most of today and tomorrow for the crafts I love.

Sunday, November 9, 2008

Another Noro Sweater Done

I spent yesterday morning stitching together another sweater I knit from Noro yarn.  The first one I posted earlier this month was done with Kureyon.  This one was knit with Aurora.  Aurora has some sections of the yarn wrapped with polyester.  Hence, the shiny stretches of varying length that pop up randomly on each row. Here's a close up.  The fiber is 55% wool, 20% kid mohair, and 20% silk, and 5% polyester.   The polyester sparkles in the sun.  The color palette is #8, Lot #A for those of you who are die-hard Noro fans.


And here's the whole sweater, done in K1P1 rib and simple stockinette.  I always toy with the idea of throwing in some cables or doing a fancy stitch with Noro yarns, but since the fibers are so colorful, I always end up letting the yarn stand on its own.


I made this sweater last year with yarn I purchased in Baltimore at the October Stitches East knitters convention.  I went Noro-nuts at a retail booth that had bags upon bags of all kinds on sale.  My initial plan was to have this sweater done by the Thanksgiving/Christmas holidays, and the not-sparkly sweater done by January.  I made my deadline - sort of, being only a year late and all.

I don't usually block my sweaters.  After waiting months and years to wear them, blocking seems like one more hurdle I have to get over so I just ignore it.  But the pieces of this sweater were jammed into a small bag for about 12 months, so the fabric looks like, well, like it's been jammed into a small space for a year.  Wet blocking will definitely be needed here.  I guess that will teach me to store knitted fabric flat until the piecing is done!

Today, I must do some housework, but I will devote a bit of time to begin sewing up a Filatura di Crosa sweater that I finished knitting about six months ago.  At this rate, I will have a whole new wardrobe by next weekend.  Thank you again, Jane.

Saturday, November 8, 2008

Another Sweater Completed

In keeping with two challenges this month - Jane's lists and TIF, I can proudly report that another sweater has been sewn together.  I started the cotton sweater shown below in March of 2008.  The fiber was purchased before I left New England from a yarn auction my local knitting guild sponsored to raise money for its speakers and trips.  One of the members donated enough organically-grown cotton to make a sweater and I was the highest bidder.  The fiber sat in my stash for about three years until I moved south and found the climate more suitable to fibers less warm than wool.

I chose the caterpillar stitch because I wanted a mindless stitch that was relaxing but that looked good with the fiber.  One thing I particularly like about the sweater now that it is done is the side seams.  I did a three-needle bind off for the shoulders, but left a slipped-stitch selvedge at the other seams.I decided to try stitching the seams together from the right side of the fabric to create a raised rib.  I really like how it looks on this particular sweater, but I am not sure how well it would compliment fancier stitches.


Here's the completed garment:


I have to confess that I have not picked up the hand quilting hoop for the TIF challenge, but I hope to get to that this weekend.  And the teapot quilt blocks?  Totally disassembled and... But that is a story for later.


Wednesday, November 5, 2008

Lists and Other Ideas


Since I have had two days of vacation this week, I have had time to catch up on other TIF-ers' blogs.  I have a list of fifteen or so I visit when time allows and yesterday, one set me to thinking.  Jane of Loopy Lou's Adventures into Handicrafts prepared a project to-do list for the month of November.  It made me revisit the times in my life when I scheduled at least one task each day, every day, for completion.  Incomplete tasks got carried over to the following day until they were done.  I was really productive when I did that, but I gave up the process after my son was raised and I had more free time (time to waste?)

Since work expands to fill the time, as the saying goes, I decided to make a stab at efficiency and compose a list of projects of my own to complete this month.  This is not a tough thing for me to do.  I have five sweaters that have been knitted but are still in pieces, waiting to be sewn up for wearing.  Two of them, both of Noro yarns, have been sitting in my knitting bag for two years and one, of a no-name rayon, for three years.  Two are cotton sweaters that I wanted to wear this past summer, but they never quite got pieced.  I also have a sweater that needs altering.  My Tulsa sister told me on Saturday that this was a "disgraceful" (her word) state of affairs.  These UFOs, of course, are in addition to the new projects I'd like to tackle: the TIF challenge piece, plus the two pairs of socks I want to knit for my husband for Christmas.

So, I spent yesterday morning sewing up one of the Noro sweaters I knit last Winter.  It is the lead photo in this post.  I have four more sweaters to go.  I also managed to rip out the cuffs and four inches of sleeve in the sweater that is too big and needs altering.  The live stitches of one sleeve are loaded onto a needle and ready to be re-knit to the proper length.

As to the TIF challenge piece, I also squeezed in a trip to Wal-Mart and bought the thimble and hand quilting thread.  I hope to devote a few hours on the weekend to practicing on the design I chose.  But tomorrow, I head back to work and that will limit my fiber time in a big way.   I think, though, that as long as I chip away at the projects, I may actually be able to have no UFOs by November 30th.   Thank you, Jane!


Monday, November 3, 2008

Choosing a Design

I played around with some design ideas last night for the November TIF challenge.  There were a couple of things I wanted in the finished piece:  I wanted color, not the traditional white-on-white stitches, because I could see more easily if my stitches were even or not; I wanted long enough "runs" of the stitches and repeated lines in order to get in enough practice to master the technique of hand quilting (oh, all right, begin to master the technique); and I had to somehow use typography in the piece. 

Here is one design.  I was going for mini-quilts with embedded letters. 


And here's the second design with the typography more obvious.


Then again, I could stitch some mini-quilts and go with typography that includes symbols, like the example from my inspiration book.


So, my tentative plan is to stitch the mini-quilts in the layout of the first figure and then decide later how I will apply the lettering.  Tomorrow, if the lines at the polls are not too long, I will have time to shop at Wal-Mart for the thimble and thread.  If I'm lucky, I'll find the supplies I need.  My LQS doesn't carry either the metal thimble Alta recommends or hand quilting thread.

I might mention here that the thimble Alta uses has a top or dome with a lip around it (almost like a saucer).  The lip keeps the needle from slipping - a constant problem I had in the class.  The key to small, evenly spaced stitches is simultaneous control of the fabric and the needle as well as holding the needle as close to the tip as possible.  Having a bottle of Advil or Motrin on hand doesn't hurt either both for the headache from eye strain and the cramped fingers.  Alta asked us if we didn't find the stitching relaxing.  Not yet, Alta, not yet!

Sunday, November 2, 2008

Letters and Stitches

I was really happy to see Sharon's November assignment.  The only thing I have more of than fiber is books, so I am really glad to be asked to somehow work the printed word into a graphic design.

One thing I had fully intended to do, no matter what the challenge, was to use hand quilting in the project.  You see, yesterday I took a hand quilting class with Alta Miller, a lovely lady from our local Mennonite community.  Her handwork is absolutely stunning.  Her stitches in a completed project are probably about 1-2 mm long.  And her stitches are so even that some people who view her quilts ask her if she did the quilting by machine.

You might think a perfectionist like Alta would make for a stern teacher, but she is definitely on my short list of saintly people.  Her patience with all of us was nothing short of miraculous.  I never heard a discouraging word all morning from her, even though a couple of us (like me) certainly had work worthy of lots of criticism.  Her only themes:  "Keep going.  You will get better.  It's hard at first, but you'll see by the end of the morning that your stitches will get smaller and more even." 

The assigned project in the class was a pineapple - you know, in preparation for one of those beautiful pineapple quilts?  Yeah, right!  Here's my 12 inch (31 mm) hoop with the quilt sandwich loaded.  It's hard to see the pineapple, but I assure you that it's there and about 3/4 of the way done.


And here's a close-up, sort of.  The leaves were worked first and the stitches in that section are about 5 mm long.  The scales were worked later in the day and the stitches on that part of the pineapple are about 3 mm long.


Only one woman in the class of 7 finished her project and Alta allowed as how it was the best one any student of hers ever produced on a first try.  Let me tell you that hand quilting is hugely difficult.  I may never get the teeny stitches Alta achieves, but I agree with her that, with practice, I can at least get passable results.  It's all about controlling the fabric and the needle.  So I am off to Wal-Mart later today to find the thimble Alta recommends as well as some hand quilting thread.

So how does all this fit into November's TIF?  Well, I am going to rip out the pineapple and work a graphic design in hand quilting.

A year or so ago, I bought a book called "ABZ:  More alphabets and other signs" at Barnes & Noble.  The 221 pages are full of graphic designs, about half of which could serve as an inspiration for this challenge.


I have not yet settled on a design, but I'm thinking it will have the following characteristics:  there will be letters, not words; the quilting will be done in as many straight lines as possible (after working the curved pineapple scales, I know my limitations at this point in the learning process); and I'll use colored thread in order to see the design better.  Here's an inspiration page so that you get a feel for where I'm going with this.  And now, I'm off to do some housework before I rip the daylights out of that pineapple.


Saturday, November 1, 2008

Final photos for TAST

First off, let me thank everyone who left comments on the TAST 2007 sampler I worked as part of last year's challenge.  I am always amazed at the generosity of the needlework community when it comes to taking time from their own work to offer advice and praise to others.

After fiddling a bit with my camera and waiting for daylight, I managed to get a few additional photos of the sampler's panels.  This is about as good as my camera allows, so I thank you for your indulgence.   The white dots are all white glass seed beads, except for the French Knot panel which contains no beading at all.


One additional note on how this canvas was worked:  I used a back-light to see the grid properly.  Even in daylight, it helped to have the canvas illuminated from behind.  My only do-over would be to use perle cotton thread throughout.   I completed the first four or five panels with 2 strands of DMC white floss, and these came out just fine.  But as Sharon assigned more complex stitches, DMC #8 perle cotton worked much better.  The difference in threads is not noticeable in the finished canvas fortunately.  For some later stitches in the challenge like French Knots, I returned to two strands of floss because of the flexibility of the thinner untwisted threads.  But overall, perle cotton was superior.

As to the disposition of the teapot blocks: they are all ripped out - talk about a do-over!  I will report on that project throughout this month, as well as the November challenge, as I have three days of vacation coming up.  That plus the November holidays will give me the opportunity to do a few more entries that I am usually able to produce in a month.

Having to do these blog entries certainly keeps me on top of my projects!  I am beginning to see why some fiber artists rely on blogging so much.  It's kind of like Weight Watchers, only there are no annual dues and you can eat all the chocolate you want.

Saturday, October 25, 2008

TAST Map and Panels

When I completed my TAST sampler somewhere around December 28th of 2007, I decided to make a "map" of the panels and create a list of the stitches as a "key" so that each stitch variation would be identifiable at a later date.  Good thing, too, because in reviewing the sampler, there were several stitches that really didn't ring a bell, so to speak.  Here's the map.  It folds out from the last page of the second notebook.


And here's the list of stitches as assigned each week.  I also gave each stitch a "grade" from 5 plusses (really enjoyed working the panel) to 1 plus (never again), in case I ever wanted to select a stitch for use in another project.  The key is in the notebook glued to the page preceding the map.


I tried phot0graphing a few  areas of the sampler to give you an idea of what some of the individual panels looked like.  I tried some closer shots but they were blurry and I just didn't have the patience at 7 AM in the dark to try to fiddle around with the camera (dawn breaks here now at 8 AM or so, but we go to standard time next week so that will change soon enough).  The panels on the left were mostly done at the end of the challenge; the panels to the right were done early on.


As the challenge progressed, I got a bit freer with some of my variations.  I especially liked working the "Christmas tree".  The three white blobs are white buttons that were attached using the shisha stitch (I wanted to keep the work completely a black/white affair.)


And here's my TAST SOS.  After I had worked the running stitch, I noticed that I had long and short stitches arranged like dots and dashes.  I checked a morse code list and I had stitched T, A, and S.  I was absolutely floored by the serendipity.  So, I stitched TAST next to the panel just for jollies.  Sometimes, things work out in unexpected ways which make a person marvel at the Universe.


Now that I have completed this posting, I am thinking that I will photograph each panel and put it into the notebook so that I have a record in the journal in case it gets separated from the actual sampler.   After, I have others' work pasted into the journal - why not my own?  But I will have to figure out how to get good close-ups.  I may go to my non-digital camera.  I am just not that enamored of digital technology and my camera is definitely not high-end and do-it-all, so it may be a while before I get that task done.  And if I somehow get the panels photographed and inserted into into the journal before the end of the year when the current challenge ends, I promise to post the results.

Friday, October 24, 2008

TAST Journal

Before I undertook the TAST challenge, I had read a lot about the love some people have for moleskine journals.  Somehow, it sounded like the very fact they used these notebooks instead of a marble copy book made all the difference to them.  So, as part of the 2007  TAST challenge, I decided to keep a written record of my progress in one.  I selected a package of 5 tiny notebooks, mainly because of the cost:  they were the cheapest (most reasonably priced?) of all of the moleskine possibilities that were available at Barnes & Noble.  It took me two of the five notebooks to complete a year's worth of TAST notes about the stitches.  Here are the two bulging books:


The first page was devoted to recording the materials I had purchased for the project, which I had hoped when completed would turn into a case for my knitting needles.  I stapled a sample of the two possible fabrics that would line the case to the inside cover of book 1.  Here's a photo:


I then set about recording my thoughts on each stitch as I completed a panel of the canvas.  Before I wrote (but generally after I had completed my own set of stitch variations), I surfed the Web for the work other TASTers had done on the same stitch.  I downloaded pictures of their work to include with the notes in order to have a visual record of the different interpretations of how the assigned stitch could look.  Here's one page that's pretty typical of the journal:


Because most of the downloaded photos were too large to fit on the tiny journal pages, they needed to be folded.  Early on, I didn't record which fiber artist had completed a sample, but after about week 6, I began to keep better records of who did the stitching and the Web address where the work was published.  

The photo above shows how the photos fold out to complement the notes.

If I had a do-over, I'd have selected an acid-free notebook that was larger and copied the photos onto acid-free paper, although as one of my sisters points out, the book will last anyway for about 20 years and after that, who will want it anyway?  The manufacturer of the journal didn't matter to me in the end, although perhaps subconsciously I finished the project because I knew how much I had financially invested at the start.  I still have three notebooks sitting in my desk drawer, and I will most likely use them in a future project.  I like the paper medium much better than a Web log.  There's something about the physical act of writing and drawing that sets ideas in the mind, and for me, a blog does not do the same thing.  I am not sure it is just a matter of resisting technology.  Maybe I just need to buy a better digital camera and post the written journal pages?  Ah, more ways to spend more money!

Sunday, October 19, 2008

2007 TAST

Since I achieved my goal on the October TIF challenge so early in the month and since I have a couple of days vacation coming up in the next two weeks, I decided to take a walk down memory lane and post the TAST challenge I completed last year.  I am doing this partly because I am afraid if I take a hiatus from the challenge for two weeks, I won't take it up again.  Partly because I feel guilty that I didn't correspond with all the other TASTers who so openly shared their work.

In 2007, I did not have a digital camera nor was I interested in blogging.  I'm still ambivalent about both, but since one of the requirements for this year's challenge was that we blog our progress, I felt like I had to learn both if I wanted to sign on to Sharon's on-line assignments.

Anyway,  as of January last year I had recently started a full-time job and wasn't sure I'd be able to keep up with a weekly assignment.  I hadn't signed on to "Inaminuteago" in nearly a year, having stopped most of my Internet use during the move from New England to the South.  But late in December of 2006, I visited Sharon's site and after some deliberation I decided to give TAST a try and see if I could keep up.  I think only Elizabeth of "Quieter Moments" ever knew I was participating and that was when the challenge was about half over.  I managed to complete all of the stitches by the first week in January 2008.  I had two goals for myself when I joined:  1) complete each week's stitches as close to on-time as possible; and 2) keep a record of the work in a moleskine notebook.

I wasn't sure how to approach the challenge, and being practical, I didn't even consider working the stitches on waste fabric.  I guess it was my mother's voice whispering in my brain, "What are you going to do with THAT?"  So I went large and purchased some black aida cloth, lashed it to my embroidery frame, and decided to work each week's stitches in a small panel.  The size of each panel was dictated by how many variations I could think up.  The original purpose of the piece:  to serve as the cover for a knitting needle case.

The canvas measures 21" X 18 " (53 cm X 46 cm) and the embroidery is 18" X 14" (46 cm X 35 cm).  The size was dictated by the length of my knitting needles.  Here's the piece as it looked just after Christmas in 2007.


And this is a close-up of the herringbone and buttonhole stitches' panels.  The little dots are white beads I used to fill in some of the spaces.  The entire canvas is beaded here and there throughout.


I used either 2 strands of white floss or perle cotton, depending on the stitch assignment.  I started the panels at the top left of the canvas, and turned it in various directions to make embroidering each panel as easy as possible (working the middle of the canvas was a bit hard on the back, I'll admit.)  Per my usual method of operation, there was no plan for the arrangement of the panels.  The work just evolved throughout the year.

Here is a close-up (relatively speaking) of the panels as they looked about half-way through the challenge.


And here is the canvas in full at the half-way mark.  These pictures were taken with my non-digital camera and uploaded so the figures might not be as crisp as digital photos might provide.


In the coming days, I will post the finished canvas, some photos from my moleskine journal, and a "map" of the panels.  All but one of the stitch assignments made it onto the sampler.

The sampler is still on the frame.  After working two months' worth of stitches, I decided that the needle case idea was a no-go - too many delicate stitches to be rolled up and thrown in a storage bin.  Maybe blogging the work will propel me to figure out what to "do with THAT."


Saturday, October 18, 2008

Evolving Teapot Quilt

The color part of this challenge has gone much better than I had anticipated.  I finished my first quilt block using most of the color palette Sharon suggested for this month.  Here is the first block.  I have not yet embellished it with the embroidery on the petit fours or stitched the "steam" that is supposed to arise from the cup.


I decided from the get-go to not be fussy about making every angle sharp and every line perfect.  I wanted the blocks to have sort of a country shabby chic look.  I'm not sure I achieved that, but I am really happy with the first block nonetheless, given that I had altered the pattern from paper piecing to applique, changed the background requirements, and tweaked the design (cup overlapping the teapot, only three little cakes instead of six.)

I was so happy with the first block that I rushed off and did a second one , which I think I may like even more than the first.


I also cut out the appliques for five more blocks, which leaves me with two undecided as to fabric (I am planning for nine 12 inch x 12 inch (30.5 cm square) blocks in the finished quilt.)  I think I'll try to choose the materials for those after I have the other blocks completed.  That way, if I need a dark blue teapot with dark yellow plates and a pink cup to make the rest of the blocks work well together, I can make it specifically.  At this point, I used fabrics I loved and that worked well in an individual block without worrying as to how they relate to one another in the finished quilt.

Now, before all you experienced quilters recoil in horror saying, "You what!?!?!?", I actually did rethink this rather random plan and laid out the blocks with the appliques pinned to them to see if my choices worked as a whole.  That's when I decided the last two blocks would be dependent on how the first seven are assembled.   However, I must say that I was surprised at how well the randomly developed blocks came together.  I admit I will have to do a bit of finagling to get the color gradations I want in the overall quilt, but so far, so good.

So, both challenges are completed for this month, but I will continue to follow the progress of the quilt for those of you who might have an interest in this medium.

I don't wish for any "do-overs" for the quilt block I did for the challenge.  However, for those of you who have trouble working with patterned fabrics, I think I stumbled on something that might help: when selecting patterned fabrics for this quilt block, use a 1:3 ratio for the largest to smallest print.  That is, the smallest print should be 1/3 the size of the next largest print, which should be 1/3 the size of the largest print.  I suspect it would be 1:4 if four fabrics were used, and so on.  I'm sure this has something to do with how the eyes travels around the finished block, but all I know for sure is that, after sometimes playing for an hour or more with fabric combinations, that ratio always seemed to apply to the fabrics I finally settled on. 

Any other "rule", you ask?  I'm not sure yet.  Stay tuned.

Thursday, October 16, 2008

Studio 2

I have a second studio of sorts, since I live in the capitol during the workweek in a one-bedroom apartment.   It is sparsely furnished, which is good in some ways (easy to keep clean) but not in others (not particularly cozy.)  Over the two years or so that I have occupied this space, I have consciously avoided adding much in the way of furnishings since I was hoping the arrangement would be more temporary than it has turned out to be.

In any case, here is my apartment work space as it looks at the beginning of the week.  I use the dining table and spread out as much as I want.  If eating becomes necessary while a project is in full swing, I clear a corner of the table for a bit or I eat in the living room. 


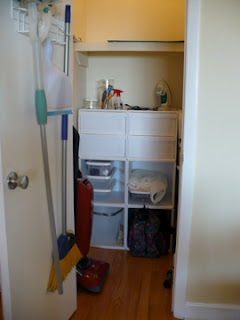
My materials are kept in the utility closet just behind the table.  I have a lot of closet space in the apartment, so I removed the clothes bar in the closet and installed some plastic shelving.  The sewing machine and the bucket share the two bottom cubbies, but craft items fill the remaining drawers and boxes.  The top shelf is large enough to store my cutting mat and rulers.  My tiny ironing board hangs in the closet on the wall to the right.


The view from the apartment is spectacular, and from my craft table I can look out and see the city fading into rural spaces.  The following photo was taken in the late afternoon looking northwest.  And yes, those are snakes on the railing and table.  The balcony is not screened so in order to deter the pigeon population of Columbia from calling my balcony home, I asked the previous owner of my unit to please leave his "pets" in place.  This works wonderfully, although it is not a very attractive solution from a human point of view.  If I end up keeping the condo long term, I will enclose the space with screening to keep out both the pigeons and the wasps, who also seem to want to share my unit.


I can't see the city from my craft table, but if I'm sitting on the balcony, this is the view I have at sunset.  I'm only about 2 miles from downtown, so the city is actually a lot closer than it appears in this photo. 


And this is how my workspace looks when a project gets going.  I leave the closet door open, the ironing board is set up on the kitchen counter and I am within  few steps of anything I need to work with fabric.  The chairs serve as temporary shelving.  Since the apartment faces west, it gets the afternoon sun so it is always bright and cheery late in the day and the projects I'm doing are easy on the eyes.  The space is always returned to its blank slate look on Thursday evenings before I return to Aiken.


Sharon asked what our studio space means to us.   For me, the space means a place where I can keep supplies in an orderly fashion without the rest of the family rummaging around in them, where I can retreat to think and plan in quiet, where I can spread out a project.  But I have to confess that I work on projects wherever it happens to suit me.  I don't feel compelled to use just the space I've designated as a studio, although I do happen I suppose to do most of my work there.

I have lived without studio space most of my life, and I can honestly say that I don't think I felt limited in any way.  For me, time has always been the limiting factor.  And while it is nice to have a special spot for fiber work, a special place to display yarns and fabrics and threads, I am wondering if such spaces are over-rated and are a product of our having too much in the way of space and supplies.  I think of the beautiful sweaters which were created in the Aran Islands by women who probably knit them next to the fire in a very small cottage, or the Gee's Bend quilts which were created with scraps by women who owned not much more than the clothes on their backs.  Studio space?  I can hear them laughing.

Would I choose to give up my space now that I have it?  Not a chance!  Has it improved creativity or expanded my horizons?  Perhaps, because the materials are organized and visible.  But I would say that the quiet evenings away from the family during the week have done more to affect creativity and output than having studio space.   I am looking forward to reading what others have to say on this.  It was an illuminating exercise for me because it really did make me think about the impact workspace has on productivity and how I've arranged my space and projects.

As for the teapot blocks, I'll show the progress in my next entry. 

Sunday, October 5, 2008

TIF for October

I was really pleased with the color palette this month.  I wanted to try my hand at a third quilt, and my LQS owner pointed out a book of patterns for small individual projects.  The book is called "A Year of Paper Piecing: 12 Sensational Seasonal Designs" by Beverly Maxvill (Martingale & Co., Woodinville, WA, USA, 2008; http://www.martingale-pub.com).   Here's the pattern that sold the book for me: 


See?  I told you last month I was more of an English garden kind of gal.

Anyway, I loved the teapot theme.  The little petit fours and the steam arising from the teacup require embroidery to embellish the piece and, well, I just loved the whole thing.   And I still loved the whole thing until I read what paper piecing required.  But I pushed ahead and studied the block some more and finally decided that I would need two certificates from psychiatrists attesting to my sanity if I were to make the block as called for by the directions.  Now, please don't get me wrong.  I am not a whip-it-up-quick person.  I don't mind taking my time on projects.  But some of the pieces on this block are so tiny I can't imagine getting them under the foot of my sewing machine without having them sucked into the bobbin box.  Plus, they are not of different fabrics! Gratuitous sewing, I say.

So I kept the design but modified it as follows:
  • I bought some lace fabric for the "tablecloth" and kept Ms. Maxvill's concept of Victorian "wallpaper" by purchasing a second fabric containing a metallic gold print.  I will use the "wallpaper" as a 12 1/2 X 12 1/2 inch foundation block and stitch the "tablecloth" to it.


  • I'll cut out the teapot and other design elements and applique them to the block.  I'll probably stitch the contrasting fabrics for the teapot and plates by machine if that makes sense.  Otherwise, it will be applique most of the way.  And since I love applique, well that will work out perfectly.
  • Instead of one block, I'll be repeating the design nine times for a quilt, but I'll use different fabrics for each block, keeping the "wallpaper" and "tablecloth" fabrics the same. 
Here are some of the fabrics I've already chosen from my stash (with a few new additions - there was  sale yesterday at my LQS.)  Not all of them will be used in this block, and a few others not shown will probably be added if I decide they look right as the block evolves and if they conform to Sharon's palette.


Here's the teapot cut out, with a possible rim fabric.


I plan to have at one block finished by the end of the month - plus a few more if I am lucky.   As to sashing, border, and binding fabrics - not yet chosen.  I thought I'd wait until all of the blocks are completed before I shop for any more fabric.  Plus my wallet needs a rest.  I am way over my $10 limit for the last four projects.

As a postscript to last month's project, Doris was gifted the quilt on Monday and she said she loved it.  And I think from her reaction she really did.   The leftover fabric also found a good home:  I gave all the Elvis fabric that remained to my LQS owner.  She told me that all week, as customers walked through the door, they'd announce, "Congratulations! You're the thirteenth customer of the day and we're awarding you some free Elvis fabric."  Not one person accepted the "prize."  Finally, one customer returned to the shop and said her sister would love the fabric to make a quilt for her son who is a loyal Elvis fan.  So everyone's happy, me included because I no longer have Elvis in my stash tempting me to use him up in another project.