Saturday, October 25, 2008

TAST Map and Panels

When I completed my TAST sampler somewhere around December 28th of 2007, I decided to make a "map" of the panels and create a list of the stitches as a "key" so that each stitch variation would be identifiable at a later date.  Good thing, too, because in reviewing the sampler, there were several stitches that really didn't ring a bell, so to speak.  Here's the map.  It folds out from the last page of the second notebook.


And here's the list of stitches as assigned each week.  I also gave each stitch a "grade" from 5 plusses (really enjoyed working the panel) to 1 plus (never again), in case I ever wanted to select a stitch for use in another project.  The key is in the notebook glued to the page preceding the map.


I tried phot0graphing a few  areas of the sampler to give you an idea of what some of the individual panels looked like.  I tried some closer shots but they were blurry and I just didn't have the patience at 7 AM in the dark to try to fiddle around with the camera (dawn breaks here now at 8 AM or so, but we go to standard time next week so that will change soon enough).  The panels on the left were mostly done at the end of the challenge; the panels to the right were done early on.


As the challenge progressed, I got a bit freer with some of my variations.  I especially liked working the "Christmas tree".  The three white blobs are white buttons that were attached using the shisha stitch (I wanted to keep the work completely a black/white affair.)


And here's my TAST SOS.  After I had worked the running stitch, I noticed that I had long and short stitches arranged like dots and dashes.  I checked a morse code list and I had stitched T, A, and S.  I was absolutely floored by the serendipity.  So, I stitched TAST next to the panel just for jollies.  Sometimes, things work out in unexpected ways which make a person marvel at the Universe.


Now that I have completed this posting, I am thinking that I will photograph each panel and put it into the notebook so that I have a record in the journal in case it gets separated from the actual sampler.   After, I have others' work pasted into the journal - why not my own?  But I will have to figure out how to get good close-ups.  I may go to my non-digital camera.  I am just not that enamored of digital technology and my camera is definitely not high-end and do-it-all, so it may be a while before I get that task done.  And if I somehow get the panels photographed and inserted into into the journal before the end of the year when the current challenge ends, I promise to post the results.

Friday, October 24, 2008

TAST Journal

Before I undertook the TAST challenge, I had read a lot about the love some people have for moleskine journals.  Somehow, it sounded like the very fact they used these notebooks instead of a marble copy book made all the difference to them.  So, as part of the 2007  TAST challenge, I decided to keep a written record of my progress in one.  I selected a package of 5 tiny notebooks, mainly because of the cost:  they were the cheapest (most reasonably priced?) of all of the moleskine possibilities that were available at Barnes & Noble.  It took me two of the five notebooks to complete a year's worth of TAST notes about the stitches.  Here are the two bulging books:


The first page was devoted to recording the materials I had purchased for the project, which I had hoped when completed would turn into a case for my knitting needles.  I stapled a sample of the two possible fabrics that would line the case to the inside cover of book 1.  Here's a photo:


I then set about recording my thoughts on each stitch as I completed a panel of the canvas.  Before I wrote (but generally after I had completed my own set of stitch variations), I surfed the Web for the work other TASTers had done on the same stitch.  I downloaded pictures of their work to include with the notes in order to have a visual record of the different interpretations of how the assigned stitch could look.  Here's one page that's pretty typical of the journal:


Because most of the downloaded photos were too large to fit on the tiny journal pages, they needed to be folded.  Early on, I didn't record which fiber artist had completed a sample, but after about week 6, I began to keep better records of who did the stitching and the Web address where the work was published.  

The photo above shows how the photos fold out to complement the notes.

If I had a do-over, I'd have selected an acid-free notebook that was larger and copied the photos onto acid-free paper, although as one of my sisters points out, the book will last anyway for about 20 years and after that, who will want it anyway?  The manufacturer of the journal didn't matter to me in the end, although perhaps subconsciously I finished the project because I knew how much I had financially invested at the start.  I still have three notebooks sitting in my desk drawer, and I will most likely use them in a future project.  I like the paper medium much better than a Web log.  There's something about the physical act of writing and drawing that sets ideas in the mind, and for me, a blog does not do the same thing.  I am not sure it is just a matter of resisting technology.  Maybe I just need to buy a better digital camera and post the written journal pages?  Ah, more ways to spend more money!

Sunday, October 19, 2008

2007 TAST

Since I achieved my goal on the October TIF challenge so early in the month and since I have a couple of days vacation coming up in the next two weeks, I decided to take a walk down memory lane and post the TAST challenge I completed last year.  I am doing this partly because I am afraid if I take a hiatus from the challenge for two weeks, I won't take it up again.  Partly because I feel guilty that I didn't correspond with all the other TASTers who so openly shared their work.

In 2007, I did not have a digital camera nor was I interested in blogging.  I'm still ambivalent about both, but since one of the requirements for this year's challenge was that we blog our progress, I felt like I had to learn both if I wanted to sign on to Sharon's on-line assignments.

Anyway,  as of January last year I had recently started a full-time job and wasn't sure I'd be able to keep up with a weekly assignment.  I hadn't signed on to "Inaminuteago" in nearly a year, having stopped most of my Internet use during the move from New England to the South.  But late in December of 2006, I visited Sharon's site and after some deliberation I decided to give TAST a try and see if I could keep up.  I think only Elizabeth of "Quieter Moments" ever knew I was participating and that was when the challenge was about half over.  I managed to complete all of the stitches by the first week in January 2008.  I had two goals for myself when I joined:  1) complete each week's stitches as close to on-time as possible; and 2) keep a record of the work in a moleskine notebook.

I wasn't sure how to approach the challenge, and being practical, I didn't even consider working the stitches on waste fabric.  I guess it was my mother's voice whispering in my brain, "What are you going to do with THAT?"  So I went large and purchased some black aida cloth, lashed it to my embroidery frame, and decided to work each week's stitches in a small panel.  The size of each panel was dictated by how many variations I could think up.  The original purpose of the piece:  to serve as the cover for a knitting needle case.

The canvas measures 21" X 18 " (53 cm X 46 cm) and the embroidery is 18" X 14" (46 cm X 35 cm).  The size was dictated by the length of my knitting needles.  Here's the piece as it looked just after Christmas in 2007.


And this is a close-up of the herringbone and buttonhole stitches' panels.  The little dots are white beads I used to fill in some of the spaces.  The entire canvas is beaded here and there throughout.


I used either 2 strands of white floss or perle cotton, depending on the stitch assignment.  I started the panels at the top left of the canvas, and turned it in various directions to make embroidering each panel as easy as possible (working the middle of the canvas was a bit hard on the back, I'll admit.)  Per my usual method of operation, there was no plan for the arrangement of the panels.  The work just evolved throughout the year.

Here is a close-up (relatively speaking) of the panels as they looked about half-way through the challenge.


And here is the canvas in full at the half-way mark.  These pictures were taken with my non-digital camera and uploaded so the figures might not be as crisp as digital photos might provide.


In the coming days, I will post the finished canvas, some photos from my moleskine journal, and a "map" of the panels.  All but one of the stitch assignments made it onto the sampler.

The sampler is still on the frame.  After working two months' worth of stitches, I decided that the needle case idea was a no-go - too many delicate stitches to be rolled up and thrown in a storage bin.  Maybe blogging the work will propel me to figure out what to "do with THAT."


Saturday, October 18, 2008

Evolving Teapot Quilt

The color part of this challenge has gone much better than I had anticipated.  I finished my first quilt block using most of the color palette Sharon suggested for this month.  Here is the first block.  I have not yet embellished it with the embroidery on the petit fours or stitched the "steam" that is supposed to arise from the cup.


I decided from the get-go to not be fussy about making every angle sharp and every line perfect.  I wanted the blocks to have sort of a country shabby chic look.  I'm not sure I achieved that, but I am really happy with the first block nonetheless, given that I had altered the pattern from paper piecing to applique, changed the background requirements, and tweaked the design (cup overlapping the teapot, only three little cakes instead of six.)

I was so happy with the first block that I rushed off and did a second one , which I think I may like even more than the first.


I also cut out the appliques for five more blocks, which leaves me with two undecided as to fabric (I am planning for nine 12 inch x 12 inch (30.5 cm square) blocks in the finished quilt.)  I think I'll try to choose the materials for those after I have the other blocks completed.  That way, if I need a dark blue teapot with dark yellow plates and a pink cup to make the rest of the blocks work well together, I can make it specifically.  At this point, I used fabrics I loved and that worked well in an individual block without worrying as to how they relate to one another in the finished quilt.

Now, before all you experienced quilters recoil in horror saying, "You what!?!?!?", I actually did rethink this rather random plan and laid out the blocks with the appliques pinned to them to see if my choices worked as a whole.  That's when I decided the last two blocks would be dependent on how the first seven are assembled.   However, I must say that I was surprised at how well the randomly developed blocks came together.  I admit I will have to do a bit of finagling to get the color gradations I want in the overall quilt, but so far, so good.

So, both challenges are completed for this month, but I will continue to follow the progress of the quilt for those of you who might have an interest in this medium.

I don't wish for any "do-overs" for the quilt block I did for the challenge.  However, for those of you who have trouble working with patterned fabrics, I think I stumbled on something that might help: when selecting patterned fabrics for this quilt block, use a 1:3 ratio for the largest to smallest print.  That is, the smallest print should be 1/3 the size of the next largest print, which should be 1/3 the size of the largest print.  I suspect it would be 1:4 if four fabrics were used, and so on.  I'm sure this has something to do with how the eyes travels around the finished block, but all I know for sure is that, after sometimes playing for an hour or more with fabric combinations, that ratio always seemed to apply to the fabrics I finally settled on. 

Any other "rule", you ask?  I'm not sure yet.  Stay tuned.

Thursday, October 16, 2008

Studio 2

I have a second studio of sorts, since I live in the capitol during the workweek in a one-bedroom apartment.   It is sparsely furnished, which is good in some ways (easy to keep clean) but not in others (not particularly cozy.)  Over the two years or so that I have occupied this space, I have consciously avoided adding much in the way of furnishings since I was hoping the arrangement would be more temporary than it has turned out to be.

In any case, here is my apartment work space as it looks at the beginning of the week.  I use the dining table and spread out as much as I want.  If eating becomes necessary while a project is in full swing, I clear a corner of the table for a bit or I eat in the living room. 


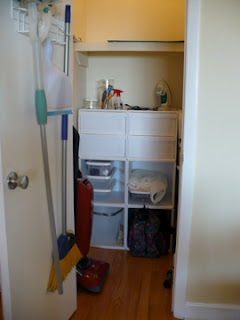
My materials are kept in the utility closet just behind the table.  I have a lot of closet space in the apartment, so I removed the clothes bar in the closet and installed some plastic shelving.  The sewing machine and the bucket share the two bottom cubbies, but craft items fill the remaining drawers and boxes.  The top shelf is large enough to store my cutting mat and rulers.  My tiny ironing board hangs in the closet on the wall to the right.


The view from the apartment is spectacular, and from my craft table I can look out and see the city fading into rural spaces.  The following photo was taken in the late afternoon looking northwest.  And yes, those are snakes on the railing and table.  The balcony is not screened so in order to deter the pigeon population of Columbia from calling my balcony home, I asked the previous owner of my unit to please leave his "pets" in place.  This works wonderfully, although it is not a very attractive solution from a human point of view.  If I end up keeping the condo long term, I will enclose the space with screening to keep out both the pigeons and the wasps, who also seem to want to share my unit.


I can't see the city from my craft table, but if I'm sitting on the balcony, this is the view I have at sunset.  I'm only about 2 miles from downtown, so the city is actually a lot closer than it appears in this photo. 


And this is how my workspace looks when a project gets going.  I leave the closet door open, the ironing board is set up on the kitchen counter and I am within  few steps of anything I need to work with fabric.  The chairs serve as temporary shelving.  Since the apartment faces west, it gets the afternoon sun so it is always bright and cheery late in the day and the projects I'm doing are easy on the eyes.  The space is always returned to its blank slate look on Thursday evenings before I return to Aiken.


Sharon asked what our studio space means to us.   For me, the space means a place where I can keep supplies in an orderly fashion without the rest of the family rummaging around in them, where I can retreat to think and plan in quiet, where I can spread out a project.  But I have to confess that I work on projects wherever it happens to suit me.  I don't feel compelled to use just the space I've designated as a studio, although I do happen I suppose to do most of my work there.

I have lived without studio space most of my life, and I can honestly say that I don't think I felt limited in any way.  For me, time has always been the limiting factor.  And while it is nice to have a special spot for fiber work, a special place to display yarns and fabrics and threads, I am wondering if such spaces are over-rated and are a product of our having too much in the way of space and supplies.  I think of the beautiful sweaters which were created in the Aran Islands by women who probably knit them next to the fire in a very small cottage, or the Gee's Bend quilts which were created with scraps by women who owned not much more than the clothes on their backs.  Studio space?  I can hear them laughing.

Would I choose to give up my space now that I have it?  Not a chance!  Has it improved creativity or expanded my horizons?  Perhaps, because the materials are organized and visible.  But I would say that the quiet evenings away from the family during the week have done more to affect creativity and output than having studio space.   I am looking forward to reading what others have to say on this.  It was an illuminating exercise for me because it really did make me think about the impact workspace has on productivity and how I've arranged my space and projects.

As for the teapot blocks, I'll show the progress in my next entry. 

Sunday, October 5, 2008

TIF for October

I was really pleased with the color palette this month.  I wanted to try my hand at a third quilt, and my LQS owner pointed out a book of patterns for small individual projects.  The book is called "A Year of Paper Piecing: 12 Sensational Seasonal Designs" by Beverly Maxvill (Martingale & Co., Woodinville, WA, USA, 2008; http://www.martingale-pub.com).   Here's the pattern that sold the book for me: 


See?  I told you last month I was more of an English garden kind of gal.

Anyway, I loved the teapot theme.  The little petit fours and the steam arising from the teacup require embroidery to embellish the piece and, well, I just loved the whole thing.   And I still loved the whole thing until I read what paper piecing required.  But I pushed ahead and studied the block some more and finally decided that I would need two certificates from psychiatrists attesting to my sanity if I were to make the block as called for by the directions.  Now, please don't get me wrong.  I am not a whip-it-up-quick person.  I don't mind taking my time on projects.  But some of the pieces on this block are so tiny I can't imagine getting them under the foot of my sewing machine without having them sucked into the bobbin box.  Plus, they are not of different fabrics! Gratuitous sewing, I say.

So I kept the design but modified it as follows:
  • I bought some lace fabric for the "tablecloth" and kept Ms. Maxvill's concept of Victorian "wallpaper" by purchasing a second fabric containing a metallic gold print.  I will use the "wallpaper" as a 12 1/2 X 12 1/2 inch foundation block and stitch the "tablecloth" to it.


  • I'll cut out the teapot and other design elements and applique them to the block.  I'll probably stitch the contrasting fabrics for the teapot and plates by machine if that makes sense.  Otherwise, it will be applique most of the way.  And since I love applique, well that will work out perfectly.
  • Instead of one block, I'll be repeating the design nine times for a quilt, but I'll use different fabrics for each block, keeping the "wallpaper" and "tablecloth" fabrics the same. 
Here are some of the fabrics I've already chosen from my stash (with a few new additions - there was  sale yesterday at my LQS.)  Not all of them will be used in this block, and a few others not shown will probably be added if I decide they look right as the block evolves and if they conform to Sharon's palette.


Here's the teapot cut out, with a possible rim fabric.


I plan to have at one block finished by the end of the month - plus a few more if I am lucky.   As to sashing, border, and binding fabrics - not yet chosen.  I thought I'd wait until all of the blocks are completed before I shop for any more fabric.  Plus my wallet needs a rest.  I am way over my $10 limit for the last four projects.

As a postscript to last month's project, Doris was gifted the quilt on Monday and she said she loved it.  And I think from her reaction she really did.   The leftover fabric also found a good home:  I gave all the Elvis fabric that remained to my LQS owner.  She told me that all week, as customers walked through the door, they'd announce, "Congratulations! You're the thirteenth customer of the day and we're awarding you some free Elvis fabric."  Not one person accepted the "prize."  Finally, one customer returned to the shop and said her sister would love the fabric to make a quilt for her son who is a loyal Elvis fan.  So everyone's happy, me included because I no longer have Elvis in my stash tempting me to use him up in another project.

Saturday, October 4, 2008

Studio 1

Sharon asks what my studio like?  I never really thought of it as a studio.  The word studio to me connotes serious art.   So I've always called my workspace the craft room.

The space is about 10 feet X 10 feet, and was meant by the builder of my home to be a guest bedroom or den.  There's a work table of dubious origin in one corner, near the window that looks out on the back garden.  When I first brought the table home from the antique market, I noticed that the whole room was taking on a terrible musty smell and the odor was starting to permeate other rooms as well.  So I dragged the table into a large shower and doused it with bleach and hot soapy water, figuring if the odor wasn't destroyed, the table was a loss anyway.  Two days later when the table was pretty well dried out, I moved it back into the craft room, and it has been serving me sweetly ever since.  It's higher than a regular table, so I can work at it standing up (I'm only 5 feet tall) or perched on a bar chair.  Plus it has two panels that fold up to give me a very nice work space.  Usually, though, I use the table as it appears below.


The boxes under the table hold small knitting tools, embroidery floss, and swatches or other tests or trials.  The two bears in the basket are remnants of my son's childhood; I can't quite bring myself to part with them yet, even though he will be graduating from college in May.  The files on the table hold scrap items and project directions I've saved over the years.  The tin baskets hold my camera and corral small containers of beads. 

My main supply storage space is in the closet.  I purchased plastic units and recycled old data cards as labels for each drawer and bin.  I organized this space about 4 months ago so it is still pretty tidy.  The bins are organized by craft item (beads, paper, paints, etc.).  The large flat containers on the overhead shelf hold my stash of yarns, organized by weight and type (sock yarns, cottons, etc.)  The left side of the closet also holds a plastic storage bin with drawers - pretty much the same view, mirror image, but most of the supplies on that side are for sewing projects.


On the side of the room opposite the table, there's a computer armoire.  The books are all art or craft books, and the clock is a tide clock.  I have set it to tell whether the tide is coming in or going out in Myrtle Beach.  The torchier lamp and the poorly upholstered chair were both my grandmother's.  I will be sending the chair out for reupholstering as soon as I have saved enough money to cover the expense.  It is the coziest chair, even if I am poked unmercifully with rogue springs, and I want to keep it no matter what.  The books to the side of the desk are all knitting publications I've saved over the years as well as some books I'd like to alter.  To the left of the desk, there's a window that looks out onto the side garden.  The room is painted yellow (the color in the following photo is pretty accurate), but the tones change as the day progresses - bright and cheery in the morning sun, but almost deep beige late in the day and at night.


I titled this post "Studio 1" because I also have a work space in the capitol.  Generally, in Aiken, I work on small projects and save anything that requires a lot of space over several days for Columbia, where I can spread out to my heart's content.  That means that knitting can be done anywhere, but the finishing is done in Columbia.  The quilting is almost all done in Columbia because I can leave the sewing machine out and I have a much larger table for cutting fabric as long as I eat my dinner in the living room.  And all new projects are designed and organized in Aiken because that's where the bulk of my supplies are.

Now that I think of it, the arrangement may make me more productive.  If I don't get the project organized by Sunday night, I have nothing to work on during the coming week.  But it does make me frustrated sometimes, like when I finish something quicker than I had expected and I don't have supplies on hand to move on to the next step of the project or start something new.

As to the TIF for October?  Well, I'll be working with the color palette again and I'll post as soon as I get the materials organized.